
Once I tested the Sonoff switch with the standard functionallity, I needed to go further and this is the objective of this mini-project… manage this Wi-Fi switch with my voice.
The steps to achieve this objective was:
- Hack the Sonoff firmware in order to upload my own code
- Connect it to my OpenHAB server
- Configure HomeKit in OpenHAB
- Create necessary rules in OpenHAB for manage the switch with Siri
Let’s go!
For the first point, I followed next instructable: http://www.instructables.com/id/Como-Conectar-El-SONOFF-WiFi-Switch-a-Ioadafruitco/
(Update 11/02/2017) Another interesting post: https://community.openhab.org/t/itead-sonoff-switches-and-sockets-cheap-esp8266-wifi-mqtt-hardware/15024
The steps of this instructable was clear and easily understandable… broadly were:
- Material:
- Sonoff (base or TH version)
- USB to TTL UART CP2102
- 5 PIN Break Away Headers – Straight
- Soldering tools
- Bringing the Module in Flash ModeThe “brain” of the Sonoff Module (normally the ESP8266) needs to be put into Flash Mode. This is done, by pulling the GPIO0 pin to GND while the chip is booting. On most modules the installed control button is connected to GPIO0 and GND, making entering Flash Mode very easy. On other modules you will need to connect pins on the PCB.
To bring a Sonoff module into Flash Mode:
- Disconnect serial programmer and power)
- Connect GPIO0 and GND (e.g. Press the button)
- Connect serial programmer
- Release GPIO0 (after one-two seconds)
- Procedure:
- Open Sonoff enclosure (just introducing some thin tool like a knife)
- Locate the pin holes (5-PIN) in the middle of the PCB
- Solder the Break Away Headers
- Connect the USB to TTL programmer paying attention to the order of the pins:
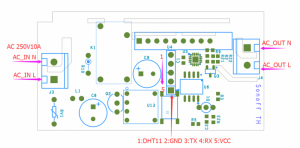
(for 4-PIN Sonoff models, starts by 2nd PIN) - Connect CP2102 USB to our computer and open Arduino IDE with the next configuration:

- This is the code that I uploaded to my Sonoff (Github source: https://github.com/wifixCode/mqtt_sonoff/blob/master/mqtt_sonoff.ino):
/*************************************************** Adafruit MQTT Library ESP8266 Example Must use ESP8266 Arduino from: https://github.com/esp8266/Arduino Works great with Adafruit's Huzzah ESP board & Feather ----> https://www.adafruit.com/product/2471 ----> https://www.adafruit.com/products/2821 Adafruit invests time and resources providing this open source code, please support Adafruit and open-source hardware by purchasing products from Adafruit! Written by Tony DiCola for Adafruit Industries. MIT license, all text above must be included in any redistribution ****************************************************/ #include <ESP8266WiFi.h> #include "Adafruit_MQTT.h" #include "Adafruit_MQTT_Client.h" /************************* WiFi Access Point *********************************/ #define WLAN_SSID "---ssid---" #define WLAN_PASS "---password---" /************************* Adafruit.io Setup *********************************/ #define AIO_SERVER "---OpenHAB-IP-Server---" #define AIO_SERVERPORT 1883 // use 8883 for SSL #define AIO_USERNAME "---mqtt-user---" #define AIO_KEY "---mqtt-password---" /************ Global State (you don't need to change this!) ******************/ // Create an ESP8266 WiFiClient class to connect to the MQTT server. WiFiClient client; // or... use WiFiFlientSecure for SSL //WiFiClientSecure client; // Store the MQTT server, username, and password in flash memory. // This is required for using the Adafruit MQTT library. const char MQTT_SERVER[] = AIO_SERVER; const char MQTT_USERNAME[] = AIO_USERNAME; const char MQTT_PASSWORD[] = AIO_KEY; // Setup the MQTT client class by passing in the WiFi client and MQTT server and login details. Adafruit_MQTT_Client mqtt(&client, MQTT_SERVER, AIO_SERVERPORT, MQTT_USERNAME, MQTT_PASSWORD); /****************************** Feeds ***************************************/ // Setup a feed called 'onoff' for subscribing to changes. const char ONOFF_FEED[] = AIO_USERNAME "/feeds/onoff"; Adafruit_MQTT_Subscribe onoffbutton = Adafruit_MQTT_Subscribe(&mqtt, ONOFF_FEED); Adafruit_MQTT_Publish onOff = Adafruit_MQTT_Publish(&mqtt, ONOFF_FEED);//Manual switch /*************************** Sketch Code ************************************/ // Bug workaround for Arduino 1.6.6, it seems to need a function declaration // for some reason (only affects ESP8266, likely an arduino-builder bug). void MQTT_connect(); #define RELAY 12 #define LED 13 #define SWITCH 0 boolean toggle = false; void setup() { Serial.begin(115200); delay(10); pinMode(RELAY, OUTPUT); pinMode(LED, OUTPUT); digitalWrite(LED, HIGH); pinMode(SWITCH, INPUT_PULLUP); Serial.println(F("Adafruit MQTT SONOFF Demo")); // Connect to WiFi access point. Serial.println(); Serial.println(); Serial.print("Connecting to "); Serial.println(WLAN_SSID); WiFi.begin(WLAN_SSID, WLAN_PASS); while (WiFi.status() != WL_CONNECTED) { delay(500); Serial.print("."); toggle = !toggle; digitalWrite(LED, toggle); } Serial.println(); Serial.println("WiFi connected"); Serial.println("IP address: "); Serial.println(WiFi.localIP()); digitalWrite(LED, HIGH); // Setup MQTT subscription for onoff feed. mqtt.subscribe(&onoffbutton); } uint32_t x=0; uint8_t lastStateSwitch = 0; void relay(char* onof){ String state = String(onof); if((digitalRead(RELAY) != HIGH) && (state == "ON")){ digitalWrite(RELAY, HIGH);//On relay digitalWrite(LED, LOW);//On led }else if((digitalRead(RELAY) == HIGH) && (state == "OFF")){ digitalWrite(RELAY, LOW);//Off relay digitalWrite(LED, HIGH);//Off led }else{ Serial.print("I got this = "); Serial.println(onof); } }//end relay void manualRelay(){ if(!digitalRead(SWITCH)){ lastStateSwitch = !lastStateSwitch;//Update switch state if(lastStateSwitch){ if (! onOff.publish("ON")) { Serial.println(F("Failed")); } else { Serial.println(F("OK!")); }//end if }else{ if (! onOff.publish("OFF")) { Serial.println(F("Failed")); } else { Serial.println(F("OK!")); }//end if }//end if }//end if }//end manualRelay void loop() { // Ensure the connection to the MQTT server is alive (this will make the first // connection and automatically reconnect when disconnected). See the MQTT_connect // function definition further below. MQTT_connect(); // this is our 'wait for incoming subscription packets' busy subloop // try to spend your time here Adafruit_MQTT_Subscribe *subscription; while ((subscription = mqtt.readSubscription(5000))) { if (subscription == &onoffbutton) { Serial.print(F("Got: ")); Serial.println((char *)onoffbutton.lastread); relay((char *)onoffbutton.lastread); } } manualRelay(); // Now we can publish stuff! // ping the server to keep the mqtt connection alive // NOT required if you are publishing once every KEEPALIVE seconds /* if(! mqtt.ping()) { mqtt.disconnect(); } */ } // Function to connect and reconnect as necessary to the MQTT server. // Should be called in the loop function and it will take care if connecting. void MQTT_connect() { int8_t ret; // Stop if already connected. if (mqtt.connected()) { return; } Serial.print("Connecting to MQTT... "); uint8_t retries = 3; while ((ret = mqtt.connect()) != 0) { // connect will return 0 for connected Serial.println(mqtt.connectErrorString(ret)); Serial.println("Retrying MQTT connection in 5 seconds..."); mqtt.disconnect(); delay(5000); // wait 5 seconds retries--; if (retries == 0) { // basically die and wait for WDT to reset me while (1); } } Serial.println("MQTT Connected!"); }- With this code:
- Sonoff switchs on when receive an string “ON” via MQTT
- Sonoff switchs off when receive an string “OFF” via MQTT
- Sonoff switchs on/off when you press the button on the enclosure during 3 seconds.
Second goal was the HomeKit plugin in OpenHAB and the connection of my sonoff.
For that, I follow the official OpenHAB documentation guidelines: http://docs.openhab.org/features/io/homekit/readme.html
- Create config file in /etc/openhab2/services/homekit.cfg
- Add the configuration relative to our device:
org.openhab.homekit:port=9124
org.openhab.homekit:pin=031-45-154
org.openhab.homekit:useFahrenheitTemperature=true
org.openhab.homekit:thermostatCoolMode=CoolOn
org.openhab.homekit:thermostatHeatMode=HeatOn
org.openhab.homekit:thermostatAutoMode=Auto
org.openhab.homekit:thermostatOffMode=Off
org.openhab.homekit:networkInterface=192.168.x.x
Additional Notes:
- Clear pairing method of HomeKit will be executed in OGSI console:
ssh karaf@localhost -p8101
passw: karaf
- Debug activation in OGSI console:
log:set DEBUG
log:set INFO
logout
- OpenHAB2 log file:
tail -f /var/log/openhab2/openhab.log
And last but not least, I needed to add the OpenHAB rule to achieve the automation with my Sonoff switch:
- Modify our items file: /etc/openhab2/items/default.items
- Add the appropiate line:
Switch SONOFF1 "Switch Sonoff1" (Switches) [ "Lighting" ] { mqtt="<[mosquitto:user/switches/sonoff1:state:default]" }(Especial attention to the order of the params, and the correct use of HomeKit tags: [ “Lighting” ] )
- Modify our rules file: /etc/openhab2/rules/default.rules
- Add the rule:
rule "Switch SONOFF1" when Item SONOFF1 changed then publish("mosquitto","user/switchs/sonoff1",SONOFF1.state.toString) Thread::sleep(1000) end - Save the file and… enjoy!
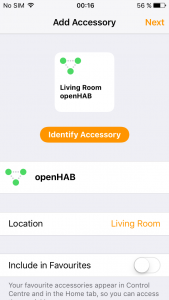
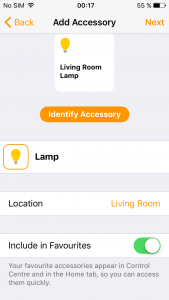
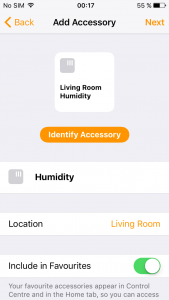
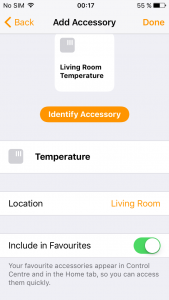
Finally, I only had to open HomeKit App in my iPhone, and start the configuration:
 |
 |
 |
 |
 |
 |
 |
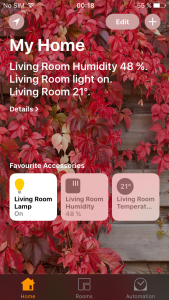 |
Note that I have an DHT22 connected to my OpenHAB, and it is also published in HomeKit with a tag in my /etc/openhab2/items/default.items file:
Number     DHT22_Temp        "Temperature [%.2f ºC]"        (DHT22Sensors) [ "CurrentTemperature" ]    { mqtt="<[mosquitto:user/sensors/temperature:state:default]" }
Number     DHT22_Hum        "Humidity [%d] %"                (DHT22Sensors) [ "CurrentHumidity" ]        { mqtt="<[mosquitto:user/sensors/humidity:state:default]" }
And… this was all!
Enjoy!!!
Hi!
I am trying to get my sonoff switch working with openhab2 following your instruction.
Currently I am having thi error in my openhab2.log:
[ERROR] [.script.engine.ScriptExecutionThread] – Rule ‘Light’: An error occured during the script execution: The name ‘publish(,,)’ cannot be resolved to an item or type.
I assume that I’ve configured MQTT in a wrong way. Could you please post your mqtt.cfg and mqtt-eventbus.cfg file contents and possibly your mosquitto.conf?
Hi Vitaliy,
My mosquitto.conf is almost the default config:
allow_anonymous falseautosave_interval 1800
connection_messages true
log_dest file /var/log/mosquitto/mosquitto.log
#log_dest stderr
log_dest topic
log_type error
log_type warning
log_type notice
log_type information
log_type all
log_type debug
log_timestamp true
#message_size_limit 10240
#password_file jp.pw
password_file /etc/mosquitto/passwd.pw
#acl_file jp.acl
persistence true
persistence_location /tmp/
persistence_file mosquitto.db
persistent_client_expiration 1m
#pid_file xxxx
retained_persistence true
listener 1883
This is my /etc/openhab2/services/mqttcfg file:
# with an ID you choose. # Define your MQTT broker connections here for use in the MQTT Binding or MQTT
# Persistence bundles. Replace
#
# URL to the MQTT broker, e.g. tcp://localhost:1883 or ssl://localhost:8883
mqtt:mosquitto.url=tcp://127.0.0.1:1883
# Optional. Client id (max 23 chars) to use when connecting to the broker..clientId=
# If not provided a default one is generated.
#
# Optional. User id to authenticate with the broker.
mqtt:mosquitto.user=openHABuser
# Optional. Password to authenticate with the broker.
mqtt:mosquitto.pwd=MyPassword
# Optional. Set the quality of service level for sending messages to this broker.
# Possible values are 0 (Deliver at most once),1 (Deliver at least once) or 2
# (Deliver exactly once). Defaults to 0.
mqtt:mosquitto.qos=1
# Optional. True or false. Defines if the broker should retain the messages sent to
# it. Defaults to false.
mqtt:mosquitto.retain=false
# Optional. True or false. Defines if messages are published asynchronously or
# synchronously. Defaults to true.
mqtt:mosquitto.async=true
# Optional. Defines the last will and testament that is sent when this client goes offline.lwt=
# Format: topic:message:qos:retained
#
My /etc/openhab2/services/mqtt-eventbus.cfg is empty, I hasn’t created the MQTT bonding:
# Name of the broker as it is defined in the openhab.cfg. If this property is not available, no event bus MQTT binding will be created.

#broker=

#statePublishTopic=

#commandPublishTopic=

#stateSubscribeTopic=

#commandSubscribeTopic=
I installed MQTT directly in Linux, and receive the messages with mqtt=”<[mosquitto:mybroker/...
Number DHT22_Temp "Temperature [%.2f ºC]" (SensorDHT22) [ "CurrentTemperature" ] { mqtt="<[mosquitto:mybroker/sensors/temperature:state:default]" }If it could help to you, this is an example of my rules:
rule "SONOFF1 Switch"

    when

        Item SONOFF1 changed

    then

        publish("mosquitto","mybroker/switches/sonoff1",SONOFF1.state.toString)

	Thread::sleep(1000)

end
I hope this could help to you...
Regards.
Thanks mate! Unfortunally it still don’t work, but at least I don’t get any more errors in the log.
Could you please explain what should I write in “mqtt=”< [mosquitto:mybroker/…" instead of "mybroker". In your instructions I see the item configuration is "mqtt="<[mosquitto:user/" but in your comment it is "mqtt=”< [mosquitto:mybroker/…". How I determine which one is right for me? Is it some kind of username or broker name? Do I need to set it up somewhere, is there config for that or I can chose any word and write it down in default.items?
After few hours of debugging I finally got it working!
As I thought earlyer the case was in this string: “mqtt=”<[mosquitto:user/switches/sonoff1" . As Sonoff switch is defined in the sketch to register itself in mqtt as "sonoff/feeds/onoff", all OpenHAB configs shoud hawe exactly that string, not the one described in examples.
Oh, yes!! In my case, my feed is: user/switches/onoff1, probably it led to confusion, sorry.
I’m very pleased that it finally worked for you!!
Rrrr